
Preface
Introduction
IIn this HowTo I outline a more secure way to initialize a hosted server. Additionally a lot of effort went into writing down my decisions and reasoning on this exact procedure.
Summary
This article offers food for thought on any server initialization of a hosted server, while including step by step instructions of a server initialization for CentOS 7, Plesk Onyx and 1&1 as hoster, .
Overall in this HowTo we enable the commonplace separate firewall (common to most hosters) in front of the server to deny any traffic until the new server is secured and finally set up. Only after the setup is finished, the separate firewall is opened restrictively. At the end of this HowTo, a checklist is supplied for everyday use.
Since this is also a real-life setup, additional updates and follow-ups are bound to follow over time.
Audience
This HowTo is aimed at everyone, who plans to deploy a hosted server. Still some steps do not cover every single detail. In that case I suggest to use this HowTo as a general guideline and dive into other HowTos where needed – or plain ask in the comments. Upon popular request I will add additional and more detailed HowTos on specific steps.
Goal
There are two goals – first of all to make people think about the process of setting up a new hosted server. Second to supply sufficient background information and explanations. As a result any reader should be much more comfortable in initializing a hosted server with 1&1 more securely, while avoiding potential loopholes and pitfalls.
General
The Internet is an evil place for new hosted servers. As soon as a new server goes online, it is prone to attack. From personal experience these attacks start immediatly once the server is available on the Internet. The obvious attacks are by ssh root or https-admin logins, as well as wp-login, XMLRPC brute force and similar for potential preinstalled WordPress sites. More attacks are by http/ftp/pop/imap on other well-known products and less obvious ones even by ICMP (yes those attacks still exist).
Some numbers from personal observations:
- Attacks happen immediatly once a server is publicly available. The closest I saw was within 10 second after a server went online.
- Massive attacks start already 1 minute after the server went online (port scan aka which ports can be used for an attack?) coupled with brute force attacks on viable ports.
- At one test I already had 752 login attempts for root, after logging on. This happened almost exactly 60 seconds after the server went online. Meaning that a brute force attack via ssh just started.
- The more professional attacks are actually rare for freshly installed servers and those are on regular not shown in the logs (most standard installation logs are not configured at a sufficient log level). So they are also hard to impossible to track on fresh installations.
These massive attacks even make sense, simply since default installations or hoster-provided installations are usually open in a security sense. So it is compareably easy to take control before the owner configured the server, maybe even before first logon. And once successfull it is even more easy to retain this control without the owner (you?!?) knowing – even during years of operation.
Bottom line: Initializing a new server is more dangerous than most might imagine. Also a lot of the consequences – even those I personally fixed are not even mentioned in this article. Those consequences are enough stuff for a blog on its own (php-executable jpg files anyone?)
And this is exactly what this HowTo is about: How to initialize a hosted server in a more secure way.
Operating System
For the most part I am indifferent about a given OS in general. Personally I believe almost every OS has its use to a given need. Still, when it comes to public available servers I strongly suggest to check if the deployment of OpenBSD is an option.
Some may consider OpenBSD just “fancy” and ignore this recommendation with a laugh and a smile. Truth be told: it is exactly the opposite. Widespread ssh-use, ssh-standards, a lot of vulnerabilites fixed in most OSs – some even before a hacker could use them,… all that is due to the OpenBSD project – for almost all OSs in use today. There is ample reason on why OpenBSD is considered the most secure OS. As a matter of fact you will read quite some hints on where to deploy OpenBSD in this HowTo and you should strongly consider to do so.
Apart from that: Whenever you use ssh, ftps,… or plain have a good feeling because your OS (whatever it is) has not been hacked so far – consider to donate to the OpenBSD project to ensure they continue their outstanding work. Simply because any OS you deploy by using this HowTo is more secure due to the effort by the OpenBSD project – even in cases where you don’t know it, like eg. Windows.
Hosting requirements
Your hoster should supply the basic requirements for this HowTo as a standard:
- Console access:
A simple remote screen by a hardware solution – serial connectors are commonplace or a managed access to a server management board. Use common sense if the provider implemented that remote screen in a secure way or plain ask how they implemented it and judge for yourself. - Edge firewall:
A separate firewall in front of your server, usually a Router, which can be configured by you anytime for your server. - Installation:
Means to install an Operating System by your choosing, either by ISO-images, optical media, minimal OS installation by eg. a bootable USB stick, image supplied by you for PXE booting or plain good old fashioned onsite installation. - Server:
Of course they should also supply the server you ordered…
Preparation
We tend to forget or not care, still a proper preparation eases the potential pain later on.
Miscellanous
Prepare your boot media after you decided what you want to install or make sure your provider supplies the images you need in the version you want. Make sure everything is available to note down or save sufficiently complex passwords, your private and public ssh key for later use and much more.
Operating System
My rule of thumb on OS choice:
- Infrastructure
For infrastructure services like firewall, network bridge, load balancer… choose OpenBSD.
Remark: There were some performance tests in the past, in which OpenBSD fared subpar. Most of those issues are gone since OpenBSD 6.x. So OpenBSD should perform well in most of these scenarios – see here. - Single purpose hosting without access by third parties (eg. customers)
When it comes to one or a few websites only, where adding or removing sites is less an issue go again with OpenBSD. Similar on single purpose services like caching, proxying,… strongly consider OpenBSD. It takes longer to setup your environment on first use, but most of what you should do in security is already done in the default installation. And the reward comes on the long term once setup is finalized: security, stability and availability. Potential guides for this are Secure Webservers with OpenBSD 6.0 (with a follow up post on WordPress installation) or PHP/MySQL with nginx on OpenBSD.
Less secure alternatives are in general common Linux distributions in their minimal installation with a strong preference for RHEL and/or CentOS. - (Non-commercial) services and hosting with access by third parties
For the most part it is a choice between OpenBSD (esspecially when the underlying service structure is static for the most part) and standard Linux distributions in their minimal installation aka Centos, Fedora, Ubuntu, Debian, and SuSE. With third-party access an OpenBSD environment for sure is of advantage for all involved parties and should be strongly considered. On the alternative Debian is my preferred choice. Most free available software (relevant to me like eg. ISPconfig in the past) runs best on Debian with a lot of HowTos freely available. - Commercial services and hosting (static and dynamic service structure)
In almost any other case I strongly advise to choose RHEL/CentOS. When it comes to compliance and requirements for commercial applications as well as availbility of software packages coupled with security, RHEL/CentOS is always a prime choice. In the end this results in CentOS as my Operating System of choice. CentOS for being binary compatible with RHEL, thus also enabling the use the Intel C compiler,… while CentOS also has a longterm update and patch window. - Windows Server and others
This HowTo does not cover other OS’s. You still might consider reading on – even if it is only about the general initialization and installation strategy.
For this HowTo I install a CentOS 7 Plesk Onyx (64 Bit) image.
Considering my remarks so far, it raises questions on why I would do this. It is CentOS 7 (check). Yet it is not a minimal installation and others already “pre-configured their philosophy” into the installation. My reasoning is simple: I do not have much of a choice, since I want to use Plesk and the license key is supplied directly during the automatic installation.
Apart from that I have bad experiences upon installation of Plesk by myself. Don’t get me wrong: Plesk offers great functionality, but it is a support and security nightmare, requiring you to know exactly what you do.
Today I know my first bad experience with Plesk was due to bugs in Plesk 11/12. Yet at that time I did not receive proper support – “your installation, your problem” was basically the answer I received. Learning from that I encountered a similar error later on. At that time on an image supplied by 1&1, which included Plesk preinstalled. Truth be told, on that next incident, I received a “24/7 follow the sun” support immediatly, during which 5 supporter, 1 consultant and 1 developer from Parallels recovered the data over the course of 48 hours (MariaDB data was inconsistent but the system still running on all sites and services, so I didn’t want to restore). To add to all of that I could proove how Plesk as a software broke the system and what 1&1 did wrong in the preinstalled image. Apart from the satisfaction of being right, I also got a decent reimbursement for my effort in that second incident – really decent by the product manager himself.
You gotta love 1&1 for that.
So if you need Parallels Plesk, choose a large hoster, who is also a Parallels partner and install the image with Plesk preinstalled by your hoster. Lessons learned…
Onsite Installations
If you are installing onsite, you should also disconnect the network cable prior to installation (and remember the cable and port you unplugged). And of course you should be using installation media with previously verified fingerprints of the OS ISO – if available for your OS choice.
Firewall
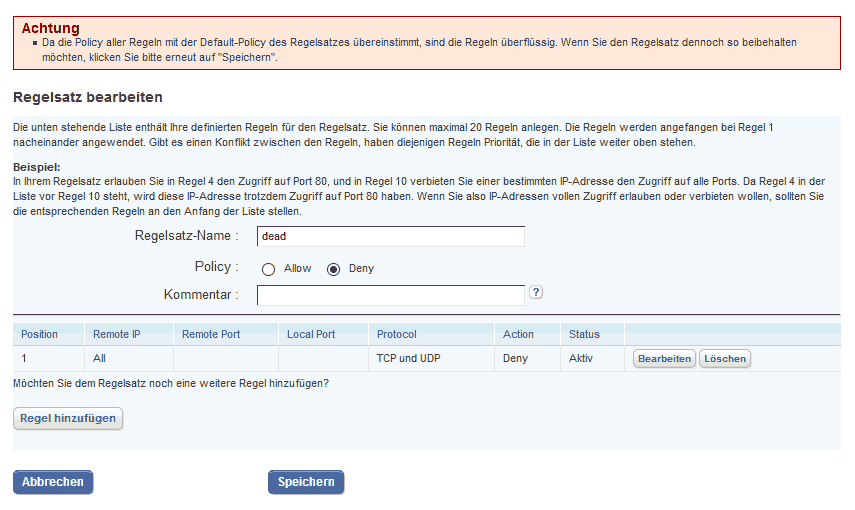
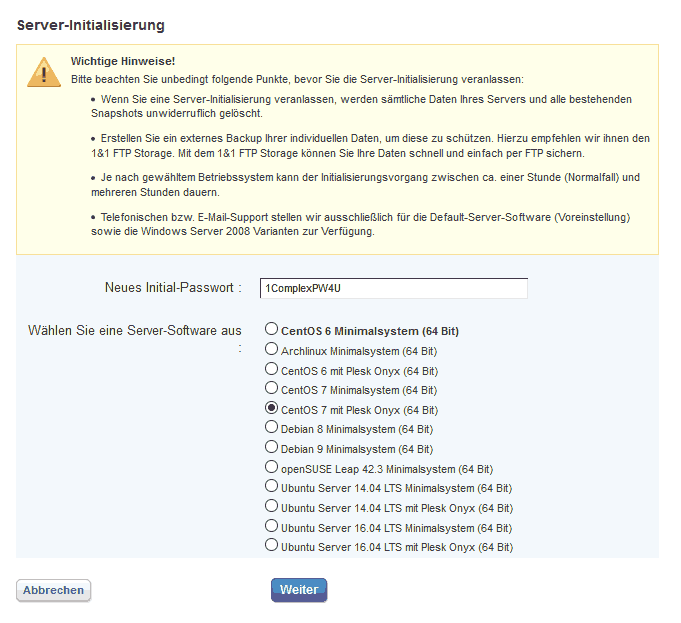
Configure the firewall provided by your hoster in front of your server to “deny all” traffic, this means all TCP, UDP and also ICMP traffic over IPv4 and IPv6. In the case of 1&1 this looks as follows (December 2017):
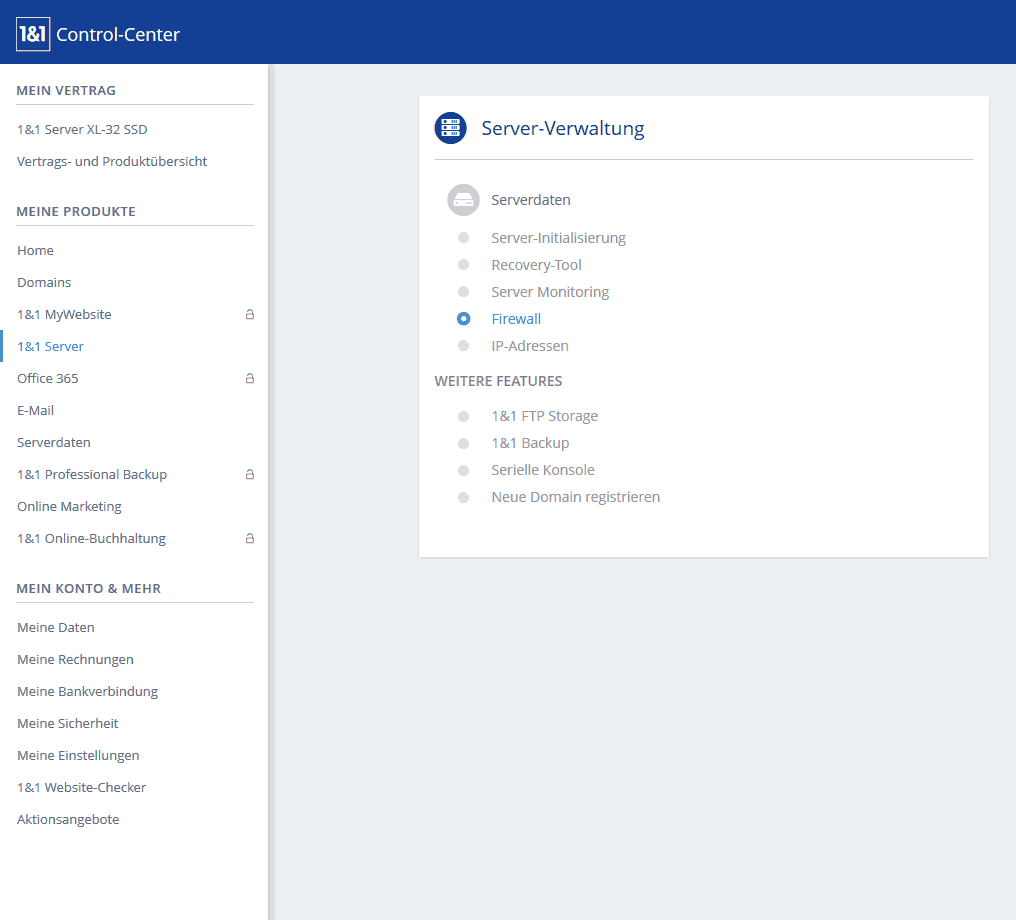
firewall menu 1&1
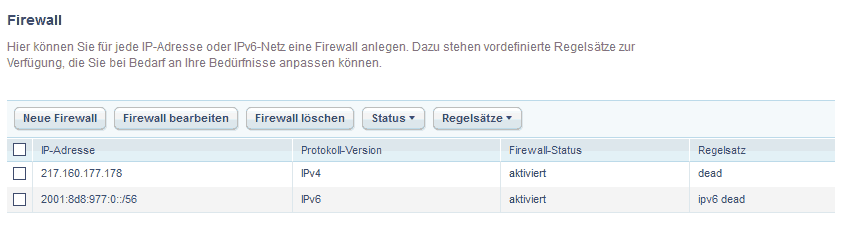
firewall ruleset 1&1
firewall rule 1&1
A few remarks on 1&1 specifics:
- Usually the blocking rules need to be defined for IPv4 and separately for IPv6 – no exception.
- The configuration can behave “weird” without any firewall rule, so I added the rule ICMP/TCP/UDP from all to all “deny” – just to have one rule set. The warning as shown in the picture “Firewall IPv4 rule 1&1” can thus be safely ignored.
Hardware
At this point we check the hardware via the console and – if available – via the preinstalled OS. We look esspecially for any hardware-related error messages during boot. This is the point where we can also deploy BIOS and firmware updates if possible and reboot to check the hardware.
The Intel-Kaby-Lake/Skylake Hyperthreading CPU bug is just a few months ago and taught us all a lesson on why we like BIOS updates as well as current microcode updates. In case you got a Kaby-Lake/Skylake-CPU you might want to check for this bug. Also at this point we configure RAID systems, check the arrays after boot and format the drives at least once optionally with a follow-up drive-check.
When done so far, it is a good habit to also write a new MBR (Master Boot Record) after rebooting in a rescue system, since the MBR could be previously infected. Once in the rescue system just identify your boot partition and type:
- In the case of a Software RAID with two discs (example devices):
/sbin/grub-install /dev/sda
/sbin/grub-install /dev/sdb - Or with a Hardware RAID:
/sbin/grub-install /dev/sda
Either does the trick on similar hardware setups.
Installation
The OS installation is Hoster specific. Usually the deployment by OS images is supported. If you can, also choose the root password and make sure its long (12+ digits) and complex enough (special characters, uppercase and lowercase characters as well as numbers).
For this HowTo I document a 1&1 installation.
1&1 server initialization
There are two options for installation:
- Standard (covered in this HowTo)
By using an image supplied by 1&1 the installation is pretty much straightforward. - Non-standard (not covered in this HowTo – just a few remarks in this point)
By restarting the server in a rescue system, the hard drive(s) can be partitioned and a third partition (after /boot and future main partition) can be used to deploy the correct bootable ISO-image or to mount a remote installation file system. Just make sure to initialize the boot loader, enabling the boot from the ISO image or to initiate the installation so your new OS of choice can write the MBR. Add a boot loader and copy installation files. In case of 1&1, the (closed) external firewall must not be touched since traffic initialized from the inside is allowed outbound as well as the respective response.
In this HowTo the standard installation by OS images is covered.
Set up environment
Setup the serial console

serial console setup 1&1
Configure PuTTY
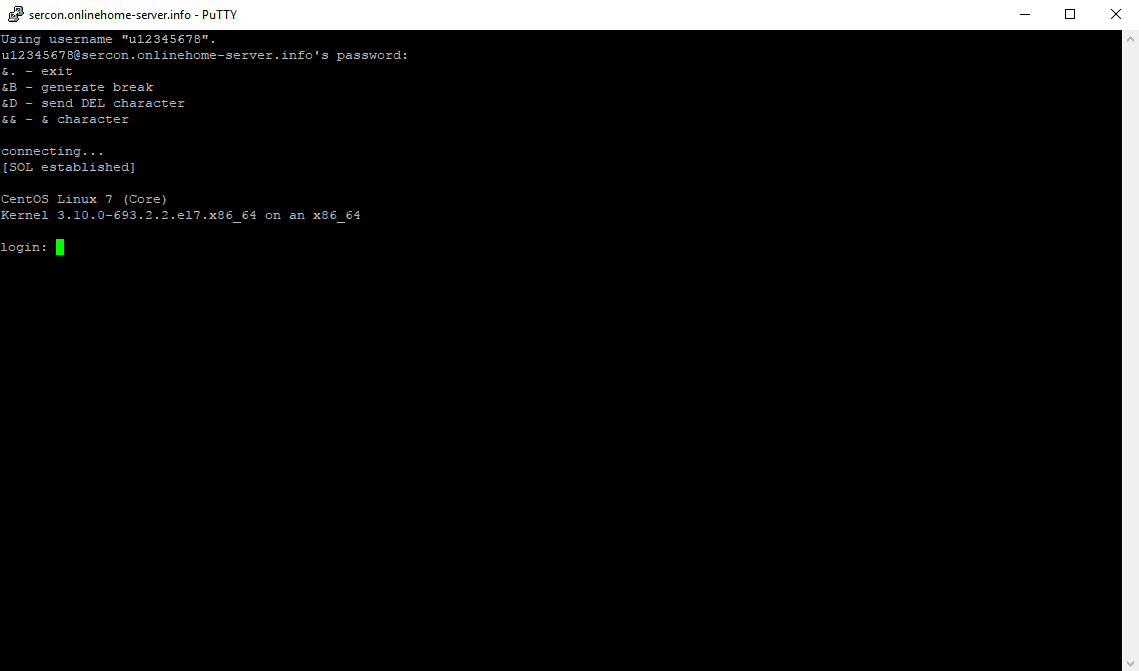
To login via the serial console just use PuTTY and ssh to “sercon.onlinehome-server.info”, but ensure to set the amount of scrollback lines to eg. 5000. Also increasing the window size (columns and rows) is a good idea:

PuTTY Serial Console 1&1
console login 1&1
For normal the serial console is unavailabe during server initialization. But in case we are already logged in prior to initialization, we are able to overwatch the whole automated deployment. Therefore just login to the serial console. Don’t forget to hit <enter> once logged in to show the login prompt.
Leave the console open.
1&1 server Installation
Now it is time to kick off the installation. In my case here it is a CentOS 7 Plesk Onyx (64 Bit) image:
1&1 server
Watch bootup and shutdown sequence
During automated OS deployment it is a good habit to watch every boot sequence closely for warnings and errors. While the messages of the boot-OS are less interesting (errors are quite common), you want to see that the OS installation completes successfully. It is even more important to watch your new installation boot for the first time.
Did you set PuTTY buffer to 5000 lines? Now is the time to scroll back and check closely for all messages.
As a rule of thumb from Bluehost, GoDaddy, 1&1 and many others, I found that usually 1 out of 100 OS installations fail in some regard. Network bandwidth bottlenecks, routing errors, Read errors on the deployment servers… Whatever but it happens. In this case: just redeploy and if that didnt fix it? Call support.
Potential “common” errors
Some errors are quite commonplace to all hosters and can be safely ignored. In case you got more or different errors – please post them in the comments section.
- VPD (Virtual Product Data) errors like “[Firmware Bug]: VPD access disabled”. Usually these errors are from PCI devices, where custom data (irrelevant to you like internal item number, housing #no,…) has not been set by your hoster. The kernel plain tells you that it can’t read data, which has not been supplied.
- Shutdown dracut errors like: “dracut Warning: Cannot umount /oldroot”. These errors are commonplace since our serial or management board console is a device too under /oldroot/dev/ttys0 or …, which is still active. Same applies to eventuall connections to the deployment server. Read those errors closely, yet in almost all cases these can be safely ignored too.
- LSB/network.service failed to start. On CentOS 7.x this is still quite common. Basically network.service and NetworkManager are both enabled and network.service fails to start since NetworkManager is already active.
- NGINX/Apache/PHP-fpm failed to start errors are also common. When no sites are configured in php-fpm, the service fails to load. This on regular also applies to nginx and Apache.
First root login
Here we go finally. First things first: we set a new root password, add a user and set the password for the new user.
We log out and login again as the new user “mytestuser” in our case. This is just to ensure it works and to setup ssh key based authentication.
Finalize installation
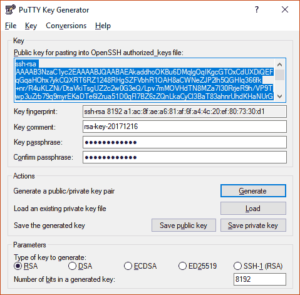
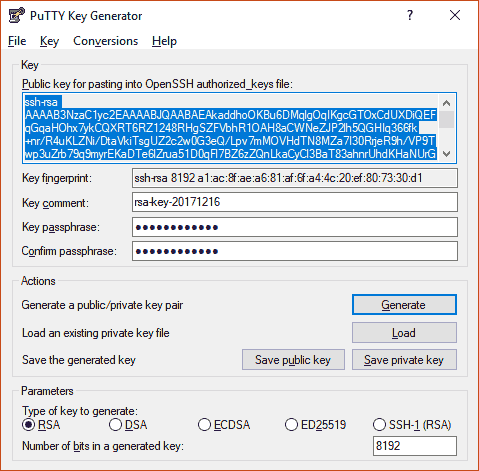
Configure ssh key based authentication
While the external firewall is still active, we now configure sshd. In case you do not have a key pair, we are going to create one. In this example I outline these steps from a Windows-system.
- If you have not done already, download the full PuTTY package including all binaries and install.
- Start PuTTY Key Generator, chose RSA, enter 8192 for “Number of bits in a generated key:” and hit the Generate button.

PuTTY key generator
- Once done, enter a pass phrase and save the private and the public key in a safe place. Esspecially the private key should be in a safe place.
- Mark and copy the public key in the PuTTY window.
PuTTY key generated
- While still logged on as mytestuser on the server, create the directory .ssh in your user’s home directory and edit the file “authorized_keys”.
mkdir ~mytestuser/.ssh
vi ~mytestuser/.ssh/authorized_keys
Insert the previously copied public key into the file and save. - Now adjust the rights.
chmod 700 ~mytestuser/.ssh
chmod 600 ~mytestuser/.ssh/authorized_keys
Make sure the directory .ssh and the file authorized_keys are both owned by mytestuser or plain do a:
chown -R mytestuser:mytestuser ~mytestuser/.ssh - Now change to root, maybe by “su -” and adjust sshd_config
vi /etc/ssh/sshd_configWe want to change these values (remove the hashtag where applicable):
PubkeyAuthentication yes
PermitRootLogin no
StrictModes yes
LoginGraceTime 1m
ListenAddress yourIPv4address1 yourIPv4address2 …
ListenAddress yourIPv6address1 yourIPv6address2 …Also we want to add the following lines:
Protocol 2
AllowUsers mytestuserOn CentOS/RHEL make sure that UsePAM is default: UsePAM yes
Weird things happen on CentOS/RHEL if UsePAM is set to no.

Check errors
Reboot, check the boot sequence and recheck the logs for any errors besides those we already found. The other errors by nginx, php and Apache are most likely gone, once those services are configured.
Since NetworkManager is the recommended service in CentOS7+, network.service is not needed at all. By using “systemctl disable network”, the pesky network error should be gone.
Cleanup and update
Usually it is a good habit to clean up yum:
yum clean all
Afterwards it is time for a system update:
yum update
Enable firewall for ssh
Open up ssh and ICMP by reconfiguring the external firewall to allow ssh and ICMP over IPv4 and IPv6.
Done.
Next steps and remarks
A few things to note:
- Before going into production, enable SELinux (CentOS/RHEL) or AppArmor (Debian/Ubuntu). There will be a guide on SELinux in due time on this site.
- Additionally consider using fail2ban and rkhunter at least.
- During or after all the services you need are configured on the server, additional ports need to be opened on the external firewall. Keep that in mind if you run into errors and don’t disable that firewall completly – never. Not even for testing.
- Most likely ssh needs to be reconfigured for more users later on or in a different way. Expect a more in-depth guide on sshd on this site soon.
Recap
After all we just setup a hosted server, while the server was not available to the public. Only after proper startup and configuration of a secure remote login has the server been available.
From here on it is a more trusted environment to finalize the server configuration.
Leave A Comment